Showing posts with label crafty adventures. Show all posts

Monday, July 2, 2012

Flourished Chalkboard

Hey Ya'll!

So of course I have a new project up my sleeve for the wedding. A few weeks ago while thrift store shopping with Stephanie I ran across a perfect find... only $15!


I knew immediately what my perfect project would be... so today Momma and I took the journey to Lowes to buy...


Valspar Primer in Gray Spray Paint and Valspar Chalkboard Spray Paint... I decided to paint the frame in the gray primer to keep the color very flat. I did not want the frame to be shiny... and I definitely wanted to get rid of that yucky gold!


For the chalkboard paint I turned the mirror over and used the back of it as a chalkboard... here is my finished product!


I am so proud of it! I can't wait to display our menu on it at the wedding reception! Too cute! :)


Well, I will see you soon.... I am sure with another project! :)

Sunday, June 10, 2012

Wedding Cornhole Boards ♥

This weekend Jonathan and I embarked on an adventure and let me tell you what a wonderful (and of course beautiful) adventure it was...

A few weeks ago we went and purchased a set of unfinished cornhole boards and bags to eventually paint and use at our engagement party and our wedding... well this weekend we spent our entire time together painting and painting and painting and right now we are sitting with the most fabulous set of cornhole boards ever. Can I just say I am swooning?

All our supplies ready to go!
Putting on the first coat of white primer... in the kitchen of course!
Beginnings of the border--we used painters tape for the lines.
Jonathan worked on our designs and this was the final product. We laid down tape and then used an exacto knife to make a stencil.
Here's our first board ready for paint! We were so nervous!
We painted it a grey-blue color and then pulled off the tape. Our first few pulls went really slow because we didn't want to mess it up!
Finished grey-blue board... LOVE!
A few hours days later here is our completed set.
We absolutely adore them!

Jonathan and I had a blast working on this project together and I am so thankful for the experiences we had. Yes, we argued over little details and then laughed about it later... haha. Experiences like this truly make us love each other more

Have a great evening! 

Sunday, January 1, 2012

Bella Get's Some Style

Most of you know that I have two precious, absolutely adorable cats named Francesca and Bellabee.


Even though they have the cutest little fuzzy faces their claws can destroy most of my furniture.... so with this comes my newest quickest crafty trick...

I have always thought that cat scratching post were super ugly... mainly the beige carpet that is wrapped around the base. So I decided to change it...

Materials
Basic Scratching Post (I found mine a PetSmart)
1/2 yd of your favorite fabric
Staple gun
..... and finally a good friend.....

Step 1: Admire very ugly scratching post and imagine some sort of possibilities!


Step 2: Turn scratching post upside down and unscrew the post from the carpet base.

Step 3: Cut out fabric to fit around base.


Step 4: So that the corners will not be bubbly cut diagonals into fabric.


Step 5: With the staple gun and a good friend pull the fabric tight and staple. Sorry I don't have any pictures of this because both Meredith and I were using all of our hands to pull the fabric super tight!

Step 6: Admire your cute little base and re-attach post!


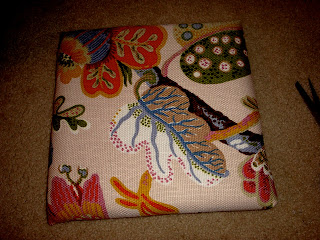
Step 7: Find a cat that will love your cute scratching post! Also you can totally see that I used some of the fabric that I had left over from the chair reupholstery!


Hope you enjoy making your personalized scratching post!!

Happy crafting!

Wednesday, August 10, 2011

Classroom Craft: Cork Board


Classroom Craft Two: Nifty Cork Board

Materials:
Plain Cork Board, Ribbon (I found 3 I loved!), Paint, Masking Tape, Exacto Knife


Step One:
Tape off the edge around the cork board, use the exacto knife to make sharp edges.

Step Two:
Now the fun part!! Tape the entire cork board with the masking tape. You can leave the edges rough until the end and cut them all at the same time with the exacto knife.


Step Three:
Now this is really the fun part... all sarcasm aside! Since I love MATH and NUMBERS (...and this is going in my classroom...) I decided to sketch the numbers 0-9 on the board in different fonts and sizes, but the great thing about this is that you can do anything! You can sketch your name, flowers, sailboats... whatever your heart desires!

Step Four:
After drawing your design take the exacto knife and cut out each shape. I wanted to leave the numbers as the natural cork color so I removed the tape around them, but you can easily do it the opposite way!

Step Five:
Now paint whatever you want! I went for a blueish-yellow look, but you could do polka dots, rainbow, or anything!

Step Five:
Now the most amazing part is when you peel away the tape and you see your finished masterpiece! I was so amazed by how it looked!

Step Six:
Know you must add bows and ribbons! I screwed in two round hooks to the top so that I could tie the ribbon and bows, but you could easily use hot glue!

I hope you have fun trying this craft, or if you want me to make you one I would love too... I am trying to figure out where I could put another cork board!! :)

Monday, August 8, 2011

Classroom Craft: Fabric Pennants

Hello All!! So I have been in a super crafty mood and I have made two special classroom crafts and I can not wait to show them both to you! So... to begin grab you your favorite drink... (mine is Pepsi Max!!) .... haha


Classroom Craft One: Fabric Pennants

Materials:
Iron, Multiple Fabrics, Scissors, Ribbon, Heat'n Bond, One Piece of Paper

Step 1:
Cut 8.5 by 11 piece of paper in half, then fold the half in half... haha.

Take the half that you just folded and cut out an isosceles triangle. (It doesn't have to be perfect, because you want even notice in the end... trust me!)

Step Two:
Iron fabric... yes I know this sounds boring, but it will only take you a second! :)

Step Three:
Do some estimations to figure out how many pennants you should make of each color... I rounded so I had some extra pennants left over!

Step Four:
Take your fresh made pattern and trace out 11 times on each piece of fabric.

Step Five:
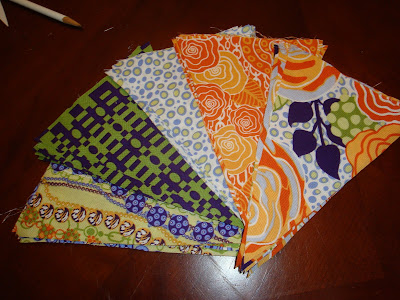
After you have cut out all 55 pennants line them up in the order you would like them for your cute little banner! :)

Step Six:
Take ribbon and Heat'n Bond and iron. Suggestion: The widths of my ribbon and Heat'n Bond were exactly the same; if I did this again I would make sure the Heat'n Bond was a tad bit smaller.

Step Seven:
Lay pennants out on your ironing board and iron away... yes this may take a little while!

Step Eight:
Since my ribbon was wide I decided to fold the ribbon over to make sure the pennants would not fall off! This definitely took some extra time but I think it is worth it! :)

Step Nine:


And here is the finished product! It looks much cuter in my classroom, so I will definitely post those pictures soon! :)

Have fun crafting! :)

Saturday, March 26, 2011

Two Little Birds

Meredith (my friend and fellow carpooler!) and I were on the way home on Friday and normally we would be heading to River Park North for a run which we are trying to make a habit... but with my hurt ankle we were mourning our non-running afternoon.. haha! ;) We then sparked a conversation about painting and decided we wanted to paint since running was not an option... darn!

So here is what I came up with:


I was so excited about how the piece turned out and how it fit in with my picture wall perfectly! I absolutely love painting and being creative and I wish my teaching career could sometimes lend itself more to both of those. Math is very difficult when pressed with EOCs and others who look down on you when your students are actually "having fun" in math class. I am hoping that upon completing my AIG licensure I can begin my career in something I am very passionate about and use my creativity there... ohh one day!

So I have a tip for the day... go be creative and if you have kids offer them every creative possibility that you can!

Tuesday, March 15, 2011

Craft like you mean it

I have recently wanted to craft in every way, shape and form recently! Last night I worked on some calligraphy and I am becoming better and better as time passes on. I hope one day I will be able to address envelopes for someone other than myself... (hint, hint, wink, wink)...! Hopefully I will find that one willing person... :)


I have also found my future craft purchase.... wait for it... drum roll please....

A MINI Sewing Machine!!
Perfectly, perfect for my tiny apartment!

My plan of adventures follows quickly after I purchase that sweet little machine...

1. A travel wallet for my Europe trip that will hold a credit card, passport, and plane tickets!
2. The most amazing ruffled scarf on the planet...

I can't wait to post pictures of these future sewing adventures so keep checking back... or follow me... that would be much more exciting I might add! :)

Happy Crafting!