Tuesday, March 15, 2011

Craft like you mean it

I have recently wanted to craft in every way, shape and form recently! Last night I worked on some calligraphy and I am becoming better and better as time passes on. I hope one day I will be able to address envelopes for someone other than myself... (hint, hint, wink, wink)...! Hopefully I will find that one willing person... :)


I have also found my future craft purchase.... wait for it... drum roll please....

A MINI Sewing Machine!!
Perfectly, perfect for my tiny apartment!

My plan of adventures follows quickly after I purchase that sweet little machine...

1. A travel wallet for my Europe trip that will hold a credit card, passport, and plane tickets!
2. The most amazing ruffled scarf on the planet...

I can't wait to post pictures of these future sewing adventures so keep checking back... or follow me... that would be much more exciting I might add! :)

Happy Crafting!

Friday, February 25, 2011

O, Raleigh-Durham Airport

Today Stephanie and I embarked on a new adventure to New York City... alone... (that is when bad things happen to us, we have decided.) So here is the story... be prepared for stupidity of the "monkey man," (reason: we don't know his name and we don't like him either...)

So today we were very good travelers and arrived at the airport early before our "first" departure time of 10:10. We quickly made ourselves comfortable and were prepared to wait for about 45 minutes, then the "monkey man" asked for fifteen volunteers to take a flight into LaGuardia instead of JFK, so we begin to debate. We then decided that it probably didn't matter what airport we flew into so Stephanie went to talk to the "man." After telling her that the new flight would leave 30 minutes later he then proceeded to tell us we didn't have an option and he was already switching our flights.... so ugh....

Finally, it was time for our original flight to board and we started to notice that only three people switched flights (like we did) and everyone (including two standbys) was getting on the plane! So to summarize this the "monkey man" really messed up all of our plans and Steph ended up getting a compensation for two free flights in the future. With all this you would easily think we headed to New York shortly after... sadly no... the flight that we were put on then had a delay until 2:05, but we really did not take off until about 3:45 and sat in the plane on the runway from 1:30 till take off....

great ending - we are finally in NYC and received a complimentary room upgrade at our hotel... we quickly thanked Jesus!

I hope everyone had a much less eventful day than we did!

P.S. To make the ending of our day more crazy there was a man in his apartment across from our room that just walked across his apartment with a towel on and drank milk from the carton... oh typical New York... (he was not very attractive by the way...) haha

Saturday, February 19, 2011

Sweet Adventures

Hello all! I have been pretty slack in my posting recently, but if you haven't noticed I did revamp my page! Don't you just love that subtle blue/gray?

As for the reason for the post: I do not have one... maybe I will tell you about my future European Adventure...

On June 11, 2011 I will leave the comforts of my precious Greenville apartment to head to London, England with some of the favorite people in my life: Mom, Tracy, and Aunt Jackie...

Below is a picture of them plus my Great Aunt Faye and Grandma. I truly love each of these ladies and I am so blessed.

This trip is going to be a blast and I recently bought a journal to document the journey! Thanks to Anthropologie for providing such cute things!

I have already started the journal because I couldn't resist the blank pages... you know me! I decided to map our journey so that I can follow where we are heading along the trip! I was very pleased with how it came out! Jonathan thought the loop in the plane trip was a little scary... I promised him we wouldn't end up in the ocean!


I can not wait to tell you all about it when I come back! I will provide tons of pictures!

On another sad note since my last post my Papa passed away. It has been very difficult dealing with my first loss of a grandparent, but I know that he is safe and much more comfortable. I will admit that you never know how much you will miss someone until they are gone. Each time I was able to talk to him and spend time with him I never took it for granted and that has helped a lot. With his passing a lot of great pictures are coming out of the boxes and I would love to share a few with you in memory of my Papa.

Mama and Papa.. what an amazing photograph.

Papa and my dad. How cute. It has also been talked about how much my dad looks like him. It is truly amazing.

I absolutely love this photograph. To be honest these pictures are so close to my heart. I can not wait to display them one day at my wedding; I secretly love when brides share the love that brought them where they are now.

It is now time for me to go work on graduate school work and quit blogging. (I wish I could blog for days, but graduate school takes up so much time!)

Have a sweet day.

Wednesday, January 5, 2011

Twisty Twig Calligraphy


...In love with calligraphy recently. So in love that I already created a name... Twisty Twig Calligraphy... I am so excited about practicing more and more! I am up for free practice projects if anyone needs any invitations addressed!

Happy Writing!

Friday, December 31, 2010

Thrifty Finds

I am so excited about a thrift store find that has turned out to be absolutely perfect and I wanted to share it with you!

Behold.... before and after pictures of a green thrift store chair....
Total Cost of entire project: $316.37

Thrift Store Chair: $30.00
Fabric (9yds): $116.37 ($12/yd + tax)
Reupholstery: $170.00

I must say the way this chair looks in my apartment is priceless. ;) I found the chair in a thrift store in Jacksonville, NC about a year or so ago. When I immediately saw it I thought I must have this reupholstered, but then I ended up deciding that I loved the green fabric. (In the back of my head I constantly thought about reupholstering!) Finally during this past month one of my students was talking about how crafty his mom was and then he said... "she reupholsters furniture sometimes..." thats all it took! I immediately talked to him about it and sent her pics of the chair and she said she could do it! Yaya! Then I had to go on the amazing fabric hunt. My mom and I immediately went to the Cloth Barn in Goldsboro, NC because they have SO MUCH fabric! While looking through the upholstery fabric I became so disappointed because nothing was like I was envisioning! Finally I walked past this beautiful fabric and asked if it was thick enough to be upholstery and YES it was!!


So I am so glad that I could share this great find and re-vamp with you! I hope that this will inspire you to go to a thrift store and find something you can make completely your own!

Hope you have a great new years!

Saturday, October 9, 2010

Out with the Old

Oh... I love changing my blog design as much as I love buying new clothes! Speaking of new clothes I recently got the cutest ECU dress ever and I am so excited to wear it to the ECU/State game!!! :)

I must say it is precious.


Okay, so I must admit the whole point behind this post was just to tell you how excited I was about changing the design. So there you go! Have a great weekend!

Wednesday, October 6, 2010

Crafty Adventures

... and I gladly present Beautiful Adventure's special event... Crafty Adventure's... grab the... pencils... glue... glitter... paper... ribbons..... and make a MESS!

today's craft: Halloween Ribbon Wreath
Forewarning... this craft takes awhile to make! Believe me! I am not a slow crafter and it took me four and a half hours... so be prepared! Also you will be overwhelmed with ribbon, ribbon, ribbon.

To begin head to a craft store and gather the following materials:

... hot glue gun, tons of glue sticks, styrofoam ring, styrofoam block, 12+ spools of ribbon, wide black satin ribbon, glitter, wooden letters for BOO, spray adhesive

Take the wide black satin ribbon and begin wrapping it around the styrofoam ring. I bought a single roll and ran out a little over halfway... I blame this on when I started I was very precise with this step and was not making wide loops... trust me the way this looks really does not matter. One spool will work as long as you make your loops wide. If you are a perfectionist then I would get two spools of black satin. Luckily I had some extra black satin from a previous project! Also as you are wrapping glue the ribbon down along the way.

After you finish wrapping the ring.. be ready to cut tons of 4.5 inch ribbon strips! Gather all of your ribbon together and cut them into 4.5 inch strips (I came up with a quick trick to help cut the ribbon on the second picture below). To have more than enough ribbon I used 14 spools. Some of the ribbons I used two spools and others I only used one. I also had a color palette in mind when I went to Michael's. Since I was making a Halloween Wreath I used some of the discounted Halloween ribbon! (40% off right now!!)

Of course with this picture I wanted to showcase how into this project my sweet Francesca was. She sat in this spot for most of the craft and pawed at every single piece of ribbon along the way. Okay here is the cutting trick: I found that if I measured up 4.5 inches from the edge of my table and then tapped a piece of tape I could easily measure the ribbon and cut. I know it sounds simple, but it took a couple of spools before I figured it out.
After cutting tons and tons of ribbon.. now is when the real fun comes! HOT GLUE BURNS! Ekkkk.. yes my finger was burned in the process so be careful! I did not use any sheer ribbons so that helped a lot in not getting burned more than I did. You need to take each 4.5 inch strip and fold it in half and glue it together. You should leave a little bit of ribbon on the end that is not glued. Its almost like you are sewing a seam with a little extra hanging off... here is my bazillion folded and glued ribbons.
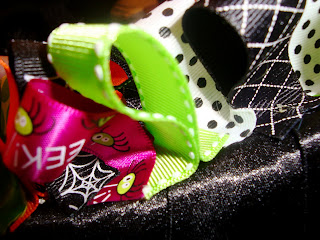
I threw them all in a plastic bag so that I could shake it to mix up the ribbons! Also... how cute are the ribbons?! I really enjoyed picking them out!

After you have glued all of the ribbons it is now time to glue them onto the black satin styrofoam ring. This is one of the fun parts!
Now you can really see that the seam makes the loop and then you have little tails. The tails are used to glue all of the ribbon to the wreath. The more ribbon you put on your wreath the fuller it looks! When I got to the sides of the wreath I glued the loops vertically.. its hard to explain.. just check out the picture..

To make the BOO take the spray adhesive and spray on the letters then glitter! This is super messy and I am sorry I don't have pictures, but my hands were covered with glitter! I actually forgot about putting anything underneath the letters when I sprayed them so now I have glitter glued to my patio... haha.. worst part is that it is the outline of an "O."

To finish the project take the styrofoam block and cut little cubes out of it... these will help your BOO stick up off of your ribbons. You can camouflage them with more ribbon loops!

I must say I am very proud of the finished project, but it did take awhile. I am sure this would be a great two day project.. but I like to finish the same day! I can't wait for you guys to make one! I love it though because you can adapt it to any season or holiday!

Have fun crafting!

Tuesday, September 14, 2010

Fatty Moments


Currently life is ordinary, but I am in love with it.

I am amazed by my students and how I apparently "enlighten" them on a daily basis. The other day I was asked, "how in the world are you always so happy?" I immediately responded with how life is a gift and I cherish each moment I can have in this world! I quickly tell them... yes I do have my down days, but there is no need to make you feel bad because of them! I wish most of the world could feel that way!

Tonight I had a fatty-fat-fat-fat moment... I had a craving for "School Cookies," sometimes referred to as no-bake or boiled cookies, but whatever you call them they are filled with chocolaty goodness... but there is a story... and note to self--no-one can cook them better than the momma, Karla, who is also the only person in the world to cook perfect Macaroni and Cheese..

So I began my journey to make these wonderful cookies (recipe will follow after story)! I took out all the ingredients.. which I had thought I had bought at the grocery store the other day, but come to find out I was out of milk :( sooo I suppose God decided I didn't need these cookies, but I did.. I then traveled to Sheetz to buy milk.

As I return home with my milk I begin the cookie making journey... yes journey

These cookies are very TIME sensitive and you have to make them happy! Well I always become very worried that I am going to cook them toooo long or tooo short (my mom gave me this recipe and I never listen to the time on the recipe, but it is actually perfect.. go figure) so I am nervous during this whole process. Since I was so nervous I forgot the butter! THE BUTTER! Paula would kill me! So these cookies were awful. So I trashed them!

Next..... here comes the second batch, which turned out wonderfully and delicious.. (hence mom always knows best on cooking durations)

Jessica's Mom's Delicious Fatty-Fat-Fat-Fat Cookies

a.k.a School Cookies

2 cups sugar

1/2 cup milk

4 tbsp. cocoa powder

1/4 lb. butter

2 tsp. vanilla extract

spoon full of peanut butter

2 cups quick oats

Mix the sugar, milk, cocoa powder, and butter together. Bring to a boil. Let boil for 3 minutes. Take off heat and mix in everything else. Drop spoonfuls of gooey chocolaty-ness onto wax paper. Then EAT in the joy of an empty house with no one to make you feel bad about eating 6 at one time! :)


you must try this at home.